UPDATE: This post continues to receive a lot of traffic - Thank you! The die I used to create the tags is no longer available. I wanted to share another die, that has three adorable small bunny shapes, that would work to create similar tags - though slightly smaller. Or, this larger bunny, that would also work. Also, the bags are no longer available from the original source. I did find these treat bags with a similar base size, but they are a bit taller. The length is easily trimmed off from the top, when the bag is flat, to create the height needed to match your fillings and tag. Thanks again!
♥ ♥ ♥ ♥ ♥
We all like easy, right? It would be nice if life came with the easy button. Sometimes, it helps to just make the little extra things a bit simpler. I love creating little treats for my grands, and neighborhood kids for the "treat" holidays. Easter is no exception. However, these little treats can easily become a LOT of work, because they have to be packaged cute, right?
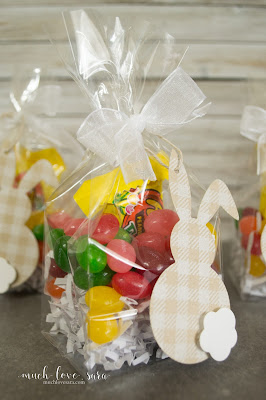
This year, I'm making it a bit simpler for myself. A Clear bag, with some Easter candies in it, and tied up with the adorable bunny tag is easy as can be, and super quick when you work assembly-line style!
Here's how I did it:
- I opened all of the bags I was using, and used my crease tool to make sure the corners were all opened up.
- I added my filling (a bit of paper shred, a peanut butter egg, and some of the GOOD jelly beans!), and set the bag aside while I worked on the tags.
- I cut a sheet of Oatmeal Cookie Card stock into quarters, and stamped two of the sections with the Flannel Life background stamp and Whip Cream Ink. I used my heat tool to dry the ink, however, you can just let it sit for a while if you'd rather.
- Then I die cut the bunnies - you can get 3 out of each quarter piece of card stock - and cut their tails out of a scrap piece of Whip Cream card stock.
- I adhered the tails to the bunny with a foam square, and then used my Punch Press to punch the smallest hole in the bunny's upright ear.
- I threaded through some twine through the hole, and tied it into a loop.
- Then I tied a piece of Special Day organza ribbon around the top of the filled treat bag, and looped the tag through the ribbon after the first knot. Tie a bow, and trim the ends of the ribbon, and you're all done!
This is a great project for making in bulk, as once you are making one, it takes very little time to create additional. Whether you are making these for a school, or church group, or just for the littles you know, it's a quick and easy, and CUTE little treat.
In the comments below, let me know who you would make one of these cute little bags for.
Thanks for stopping by!
Much love,

Fun Stampers Journey Supplies Used:
Stamps: Flannel Life Stamp SS-0325Inks: Whip Cream True Color Fusion Ink IP-0009
Papers: Oatmeal Cookie 8.5" x 11" Card Stock CS-0023, Whip Cream 8.5" x 11" Card Stock CS-0040, Clear Bags ST-0122
Embellishments: Journey Twine - Natural AC-0005, Special Day Organza Ribbon AC-0316
Tools: Hop Cuts Die Set DI-0387, Journey Platinum Machine TO-0090, Journey Blooms Paper Trimmer TO-0039, Crease Tool TO-0040, Detail Pro Shears (4.5") TO-0063, Heat Gun TO-0083, Press Punch & Cutting Mat Bundle BD-0067
Adhesives: Journey Foam Squares - Small AD-0084


Those bags are so cute!! I would make them for my 2 grandaughters school teachers for Easter. I know they would like them.
ReplyDeleteThat would be such a good idea! And teachers need all the recognition we can give them! Thanks for stopping by.
DeleteThis comment has been removed by a blog administrator.
ReplyDelete